Rendering as illusion
How rendering works, and how artists make 3D images look drawn or painted.
Stylized rendering / Part 1 / Michael Rowe Jones
I think of a 3D artist as a kind of trickster. We build a scene from shapes, lights, and materials, then spend much of our time hiding the parts that give the construction away.
For a visual-effects shot, that might mean getting a reflection to agree with photographed footage. For a painted-looking character, it might mean removing a smooth gradient or holding a pose longer than the animation software would. The convincing choice depends on the image we want to make.
Stylization reaches into every part of a 3D scene. Changing the camera, the shading, or the timing can make the same model feel very different. The study below lets you try each of those changes separately.
How a renderer produces an image
A renderer starts with geometry, materials, lights, and a camera. Geometry describes the shapes. Materials describe how their surfaces respond to light. The camera determines which view becomes the image. 1
Rasterization projects triangles onto that image and determines which samples they cover. Depth testing decides which surfaces are visible, while shading calculates their colors. Ray tracing approaches visibility by finding what a ray intersects. Further rays can follow reflections or test whether a light is blocked. Path tracing samples paths of light through a scene to estimate the light reaching the camera. 1 2
These methods calculate an image from the scene we give them. They don't decide whether that image should resemble a photograph, an illustration, or something else. An artist can model an impossible shape, paint a shadow into a material, or change the rendered image afterward.
Changing the same sculpture
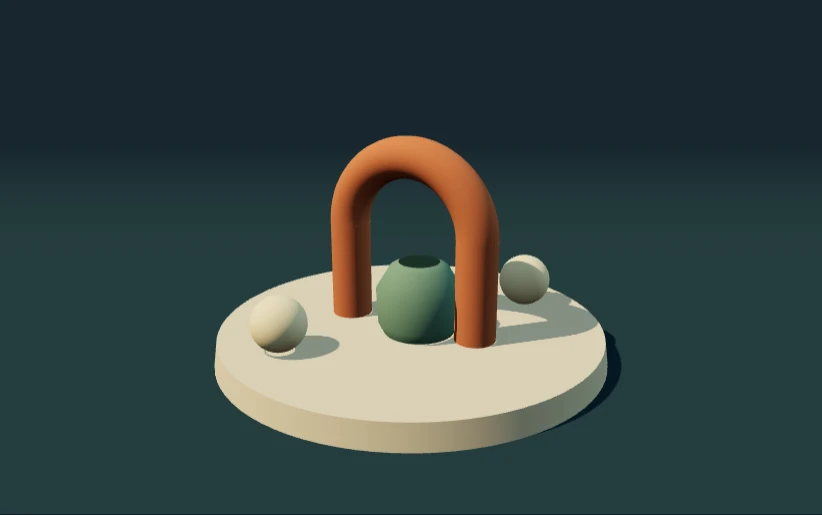
Change the camera, shading, and pose timing on one small sculpture.
Leave the study paused and look at the two cream beads. They have the same radius, but one sits closer to the camera. In perspective, the nearer bead appears larger. Switch to Orthographic and both appear the same size. Distance still affects which objects hide others, but it no longer changes their projected size.
Now compare Smooth light with Toon bands. The curved arch keeps its geometry. The material groups its shading into bands, replacing the gradual transition from light to dark with a few distinct regions. The arch can start to read as a flatter graphic shape.
Finally, play the rotation and compare Continuous with On twos. On twos displays twelve poses per second, equivalent to holding each pose for two frames on a 24 fps timeline. The rotation follows the same path, but the holds make individual poses more apparent.
Try those settings together. Orthographic projection removes one cue for depth; banded shading changes another. Held poses change how you read the movement. If the sculpture becomes difficult to follow, turn one setting back. A consistent style still needs enough information to describe the object.
Designing movement for the image
An interpolated movement can be mathematically smooth and still lack the force of a few well-chosen poses. A fast arm may need to stretch across the image, or appear in several places at once, for the action to register.
The artists behind Into the Spider-Verse used held poses, smear geometry, and extra limbs alongside print-inspired shading. Those decisions affected the animation and models before the image reached compositing. 3 For Puss in Boots: The Last Wish, the team used stepped action, adjustable rim lighting, and rendered points that broke up model outlines. 4
Neither approach requires abandoning automation altogether. A held pose still needs to arrive at the right moment. A smear still needs to follow the action. The useful question is where an automatic result helps the shot, and where an artist needs control.
Changing the rendered image
Some changes can happen after the scene has rendered. A post-processing shader reads that image and writes a new one. It can simplify shading, add grain, or move the positions from which it reads colors. 5
That last operation can break up an outline without changing the model. It is useful when the model's regular edges work against a painted appearance. It also has limits: the image contains no view of the hidden side of an object, and a filter can easily erase a thin shape along with its unwanted precision.
The brush-displacement article examines that tradeoff on a small desk scene. You can change the strength of the treatment and see where the lamp's shape begins to fall apart.
Cited works
- Matt Pharr, Wenzel Jakob, and Greg Humphreys. Physically Based Rendering, fourth edition: Introduction. Scene inputs and ray tracing.
- Khronos Group. Vulkan specification: Rasterization.
- Sony Pictures Imageworks. Spider-Man: Into the Spider-Verse. Production breakdown.
- ACM SIGGRAPH. Crafting the enchanted universe of Puss in Boots: The Last Wish. Interview with VFX supervisor Mark Edwards.
- Three.js. How to use post-processing.
The interactive format takes inspiration from Maxime Heckel's On crafting painterly shaders.